Fully Meshed Distributed Systems on a Single Server (Segmented Configuration)
Scenario
You want to set up a Fully Meshed Distributed System on a single server (Segmented Configuration). To do this, you must configure the projects in distribution on the same Server.

NOTE 1:
On a single server, you can set the projects in distribution even if their security configurations are different. That is, you can set up a stand–alone project in distribution with an unsecured project or an unsecured project in distribution with a secured project and so on.
NOTE 2:
You can set up the server communication as stand–alone, if you are accessing the Installed Client on the same server. However, if you have a remote FEP connected to the server, you must set the projects with server communication as secured in distribution.
Prerequisites
On a single server, ensure the following before configuring projects in distribution:
- Using the distribution media, you have installed the setup type as Server. The software version of Desigo CC, as well as the extension modules installed on all the distribution partner systems, is the same.
- For working with Windows App client, you have installed Internet Information Services (IIS).
- In SMC, ensure the following for the projects participating in distribution:
- You have two or more projects (having unique port numbers) with project status as
Stopped. For example, if you have three stopped projects, Project1, Project2, and Project3, you cannot set up an outdated project in distribution. You must first upgrade it to the current software version. - The projects in distribution have unique System Name and System ID.
- The projects have the same project languages configured and their sequence is also same for all the distribution partners.
- The Dist port configured in the distribution partner project is unique. Otherwise, you cannot start the project on the same server.
- On all three projects. you have configured server communication as stand–alone. Additionally, on one of the projects, for example Project3, you have web Server communication as secured, so you can log into the Windows App client and work with other projects in distribution.
- For working with distribution, the project's Pmon user must be set as Specific account (local or domain user). This user must have access rights on all the shared Server projects folders in distribution.
- To work with distribution using the Windows App Client, a web application is created and linked to Project3. The web application user must be added in the list of allowed users in the Project Shares expander of the systems in the distribution.
- (Recommended) You are sharing the project folder of the distribution participant project with the user using the Project Shares expander. This is because, while configuring the distribution participant using in the Distribution Participants expander in Automatic mode, the shared project folder path displays in the Shared Path field. In Manual mode, however, you must enter the shared project folder path.
- For each project in distribution there must be a separate HDB linked to the project. The HDBs can be on the same server as that of the projects. For example, three HDBs or separate HDBs on a remote SQL Server.
If the HDBs are on the same server connected to projects in distribution, they are linked to each other automatically.
When the HDBs are on different SQL Servers and you want the projects to see the data from another SQL linked to another project in distribution, you must manually link the SQL instances.
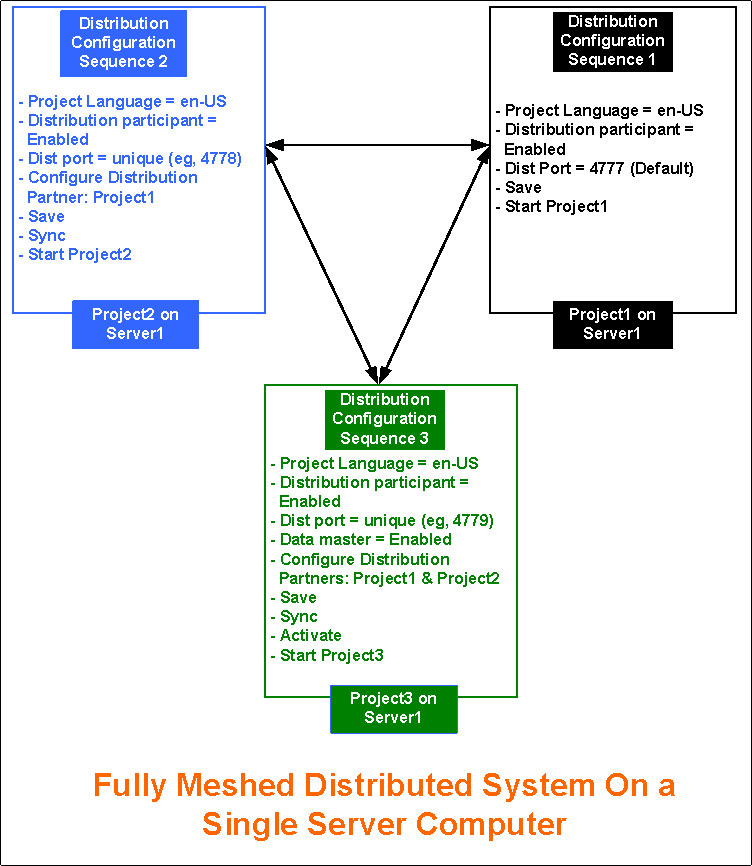
Deployment Sequence Diagram
Steps
Perform the following tasks on the same Server using SMC.
NOTE:
To avoid having to restart the project, follow the suggested distribution configuration sequence.
- In the SMC tree, select Projects > [project].
- Click Edit
 .
. - In the Server Project Information expander, enable the distribution for Project1 by selecting the Distribution participant check box.
- Click Save Project
 .
. - Click OK.
- Click Start Project
 .
.
NOTE: If there is no active project in SMC, you must activate this first. Otherwise, you cannot start it. - In the SMC tree, select Projects > [stopped project].
- Click Edit .
- In the Server Project Information expander, enable the distribution for Project2 by selecting the Distribution participant check box.
- In the Server Project Information expander, enter a unique Dist port number, other than default.
- Using the Distribution Participants expander, add the distribution partner project as Project1 either in Manual mode (by clicking New and then Extensions) or in Automatic Mode (by clicking Browse).
- Click Save Project .
- Click OK.
- Open the Distribution Participants expander.
- Click Sync to re-align the distribution partner project Project1 with details on the Originator project Project2, and to add an entry for the Originator project, Project2 in the Distribution Participant expander of the distribution partner project, Project1.
NOTE: If the local path is used as the shared path, it is removed during sync. You must edit the project in the local path, and save both Project1 and Project2. - (Optional) Click Yes to open and view the synchronization report.
- Click Start Project .
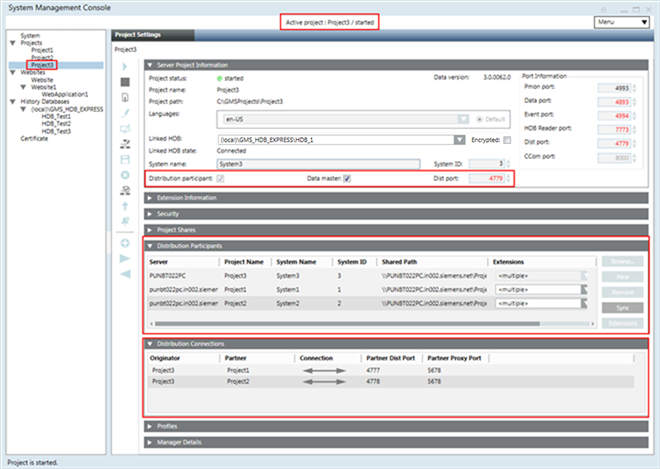
- Repeat steps 7 to 15 to set up the third project, Project3, in distribution using a unique Dist port. Then add the distribution participants as projects Project1 and Project2 in the Originator project, Project3.
- On sync, the profiles, and distribution connection on the Originator project (Project3), if changed, are re-aligned with the partner projects, in this case Project1 and Project2.
- In the Server Project Information expander, enable the Data master check box for Project3.
- Click Save Project .
- Click OK.
- Click Activate Project
 .
. - Click Check Distribution Consistency
 and view the log.
 - Click Start Project .
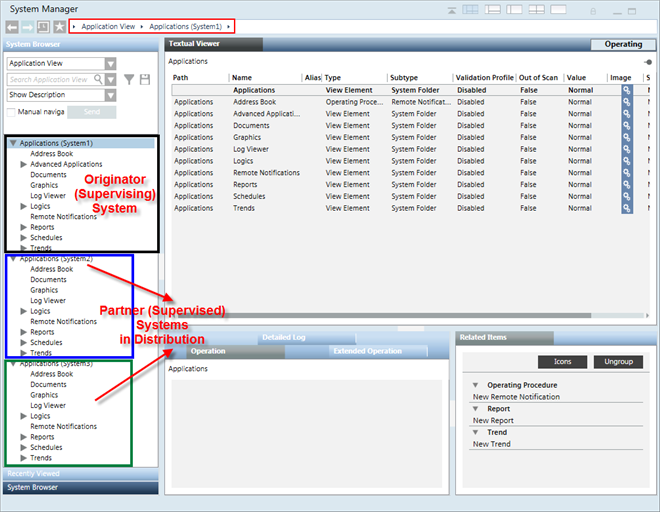
- Launch the Installed Client on the Originator System, System3 with Project3 as Data Master.
- With the System Manager in Engineering mode and the System Manager in the Management View, select Project 3 > System Settings > Security and do the following on the Originator System:
a. Create the Global User.
b. Create the Global User Group.
c. Assign the Global user to the Global User group.
d. Assign global Scopes rights and the Application rights.
e. Enable the User. - In the Summary bar, select Menu > Operator > Switchover and switch the operator from the current user to the Global User.
- You are now logged in with the Global User into the installed client of the Originator System with Project3 as Data Master. You can now work with it.
- Since, by default, the distribution Connection is bidirectional
 (Fully meshed Distribution configuration), you can also work with the all distribution Partner Systems, (System1 with Project1 and (System2 with Project2).
 - You can also launch the Windows App client for System3 (with Project3) and work with Partner Systems in distribution, System1 with Project1) and System2 (with Project2).
- If you activate one of the Partner System, for example, System1 with Project1, and log onto the installed client on System1, you can work with the Local System (System1 with Project1), as well as all the Distribution Partner Systems, System2 and System 3.