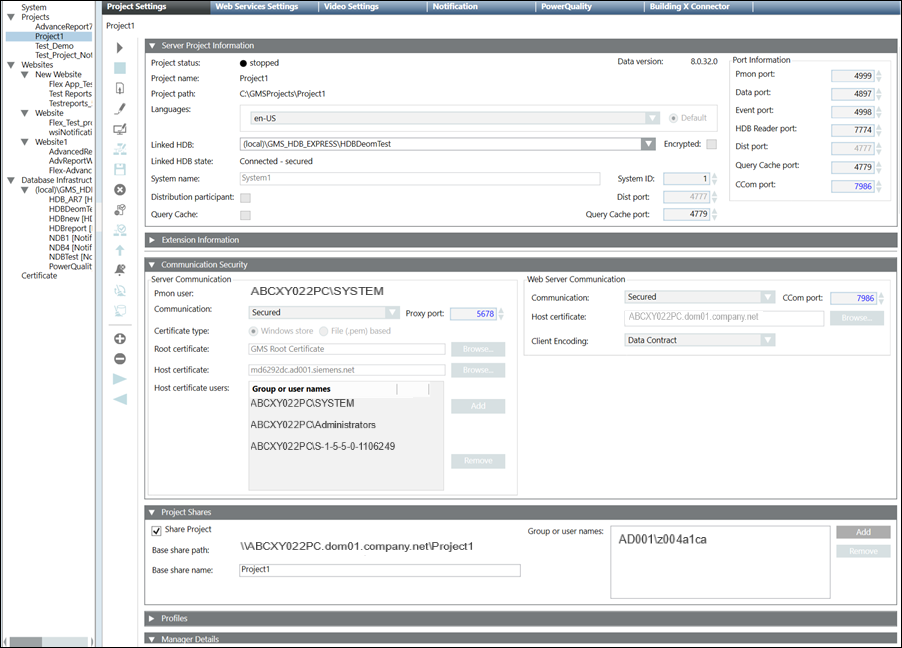
Modify the Server Project Parameters
You can edit the Server project parameters to modify the port number, or languages, Server Communication and the Web Server communication and so on. After you modify the Server Communication to Secured or Unsecured and/or the Web Server Communication to Secured or Local, a new expander, Project Shares, becomes available. It allows you to share project folder with added Windows users.
Use this procedure to modify the system name of the linked History Database. Alternatively, you can also link another History Database (for example, a new History Database, which is not linked to any project) if the system name of the project is changed.
- The project whose parameters you want to modify is available under Projects in the SMC tree and it is stopped.
- You have changed a system account user after project creation and it is not the same as the Pmon user. Consequently, in the Communication Security expander of the Project Settings tab, the Process monitor user displays in red.
- In the SMC tree, select Projects > [project].
- Click Edit
 .
. - The Pmon user is synched with the System account user.
- Some fields of the Server Project Information and Communication Security expanders are enabled.
- The Distribution participant check box is enabled.
- In the Server Project Information expander modify the following Server project parameters:
- Edit the port numbers for the Pmon, Data, Event, HDB Reader settings according to the given range. Ensure that no two port numbers are same for a project and also that they are not the same as those of another started project on the server.
- Edit the project language in the Language drop-down list. (This is allowed only when you log on to edit the StartSMC.bat file with the
/librarianswitch or you start the SMC by clicking the StartSMCEngineering.bat file that already contains the/librarianswitch.) See Tips for Configuring and Editing Project Languages in Server Project Information Expander. - Edit the project language to be used as default language by Server components for producing language-dependent contents. For example, if you set De-de as default language, in Journaling, the Date/Time fields are printed in the default date and time format for De-de in the Region and Language dialog box of Windows.
- From the Linked HDB drop-down list, select a History Database.
NOTE: You should link a History Database to only one project. Linking a History Database to multiple projects is not recommended. - Select the Encrypted check box to encrypt the communication between a project and the History Database.
- Enable the distribution by selecting the Distribution participant check box and entering a unique Dist port number.
- Edit as required the the Query Cache check box that gets enabled and selected on selection of the Distribution participant check box. Also edit the Query Cache port field.
- From the Communication Security expander, edit the Server communication details including the following:
- Communication: Modify the Communication mode by selecting one of the following:
Stand-alone: (default) Indicates that no communication is possible between Server and the client/FEP project linked to it.
Secured: (recommended) When selected, it enables a secure communication between Client and the Server project. After selecting Secured mode, you need to configure the Proxy port, Certificate type and the root, host certificates. For File (.pem) based certificates, an additional host key certificate is required. See tips in Select Certificate Dialogue Box.
Unsecured: When selected, it allows you to set up an unencrypted and unsecured communication (without certificates) between the Server and Client/FEP project. - Proxy port is enabled only when you change the default Stand-alone client/server communication mode to
Secured. The default proxy port number is 5678. - Certificate type is enabled only when you change the Communication type to
Secured. By default the Root certificate and Host certificate fields display the default root and host certificates. You can modify the default Certificate type Windows store to File (.pem) based. Note that you must provide the root and host certificates depending on the certificate type. - (Optional and required only when you want to enable Web communication between the CCom port and IIS) In the Communication Security expander, provide the Web Server Communication details as follows:
- From the Communication drop-down list, select one of the following:
Disabled: (default) indicates that no communication is possible between the CCom port and Web server (IIS). If the Web Server Communication is disabled, the Windows App Client cannot work.
Local: (in red) When selected, the web communication between the CCom port and Web server (IIS) is enabled, but it is without certificates.
Secured: (recommended) When selected, the Web Communication mode isSecuredwith certificates. In this case, you must configure a host certificate in the Host certificate field that gets enabled. See tips in Select Certificate Dialogue Box. - (Optional and required only when the Communication mode is Local or Secured) Type or configure the CCom port number using the spin control buttons. The CCom port number displays in red if the Web Server Communication mode is set as
Local. - (Required only when you selected Web Communication as Secured ) Click Browse and select a Host/Self-signed certificate for CCom port using the Select Certificate dialog box. By default it displays the host certificate which is set as default.
- (Optional and required only when the Communication mode is Local or Secured) In the Web Server Communication, select the Client Encoding type from the drop-down list. In the Client Encoding drop-down list, by default, Data Contract is displayed.
- The port numbers are changed, the default project language is edited. The default Server Communication mode and the Web Server Communication mode are edited.
- (Optional and is available only when the Web communication or Client/Server communication mode is Secured or Unsecured) In the Project Shares expander, provide the details as follows:
- Select the Share Project check box to share project folder of the current project. This automatically sets the base share name as the project name.
- (Optional) Type in the share name to change the default name. Once saved, this name cannot be edited. This name is appended to the shared project path, which is set when you save.
- Click Add to add a user/user group using the Select User or Group dialog box to the list of Group or user names. Click Remove to remove a user/user group from the list.
- (Optional and required only when you have enabled the distribution and want to configure the distribution partner projects from the same Server or another Server) Open the Distribution Participants expander and configure the distribution by adding the distribution partner project in Automatic mode or Manual mode.
- (Optional and required only when you have added the distribution partner project using Automatic or Manual mode) Open the Distribution Connection expander and proceed as follows:
a. Edit the default Distribution Connection type ( ) by changing it to (
 ) or (
 ). For more information, see Changing the Distribution Connection Type.
b. Enter a value in the Partner Dist Port field of the selected distribution partner project.
c. Enter a value in the Partner Proxy Port field (only in case when the selected partner project isSecuredwith certificates). - Click Save Project
 .
.
NOTE1: Only certificates with RSA signature algorithm are supported. CNG certificates are not supported.
NOTE2: If machine name is changed then system name is displayed in red, and you need to update Project. Internally the pmon user and HDB user is synced, and you need to create a new certificate, import it and set as default certificate. - If you have changed the security settings including the Server Communication mode, proxy port, certificate type and so on, a message displays indicating you that you must align the Client/FEP Project linked with this modified Server Project.
- If you have changed the security settings including the web communication mode, CCom port, or a CCom host certificate, a message displays indicating you that you must align the web applications on Client/FEP linked with this modified Server project. Otherwise, the web application will point to the previously configured web Server communication settings of the configured project and you will not be able to connect to the Server project.
- For an already shared project, if you change the web communication mode to
Disabledand the client/Server Communication mode toStand-alone, the project share as well as the user/user groups will be removed and a message will display indicating this. - A confirmation message displays if the linked History Database is already linked to another project.
- A message displays if the linked HDB’s system name does not match with the associated project’s system name. Click Yes to modify the linked History Database’s system name.
If you click No, the Linked HDB state displays as system name mismatch with the project. - The Linked HDB state is updated to
Connected. See Server Project Information Expander - The Profiles expander displays the base and extensions profiles of the originator, as well as of all the configured distribution partner projects.

NOTE:
Each time you close the SMC, the password for the system account user is not retained. Therefore, when syncing the Pmon user with the system account user, the SMC again prompts you for the password of the Pmon user who is a non-system user.